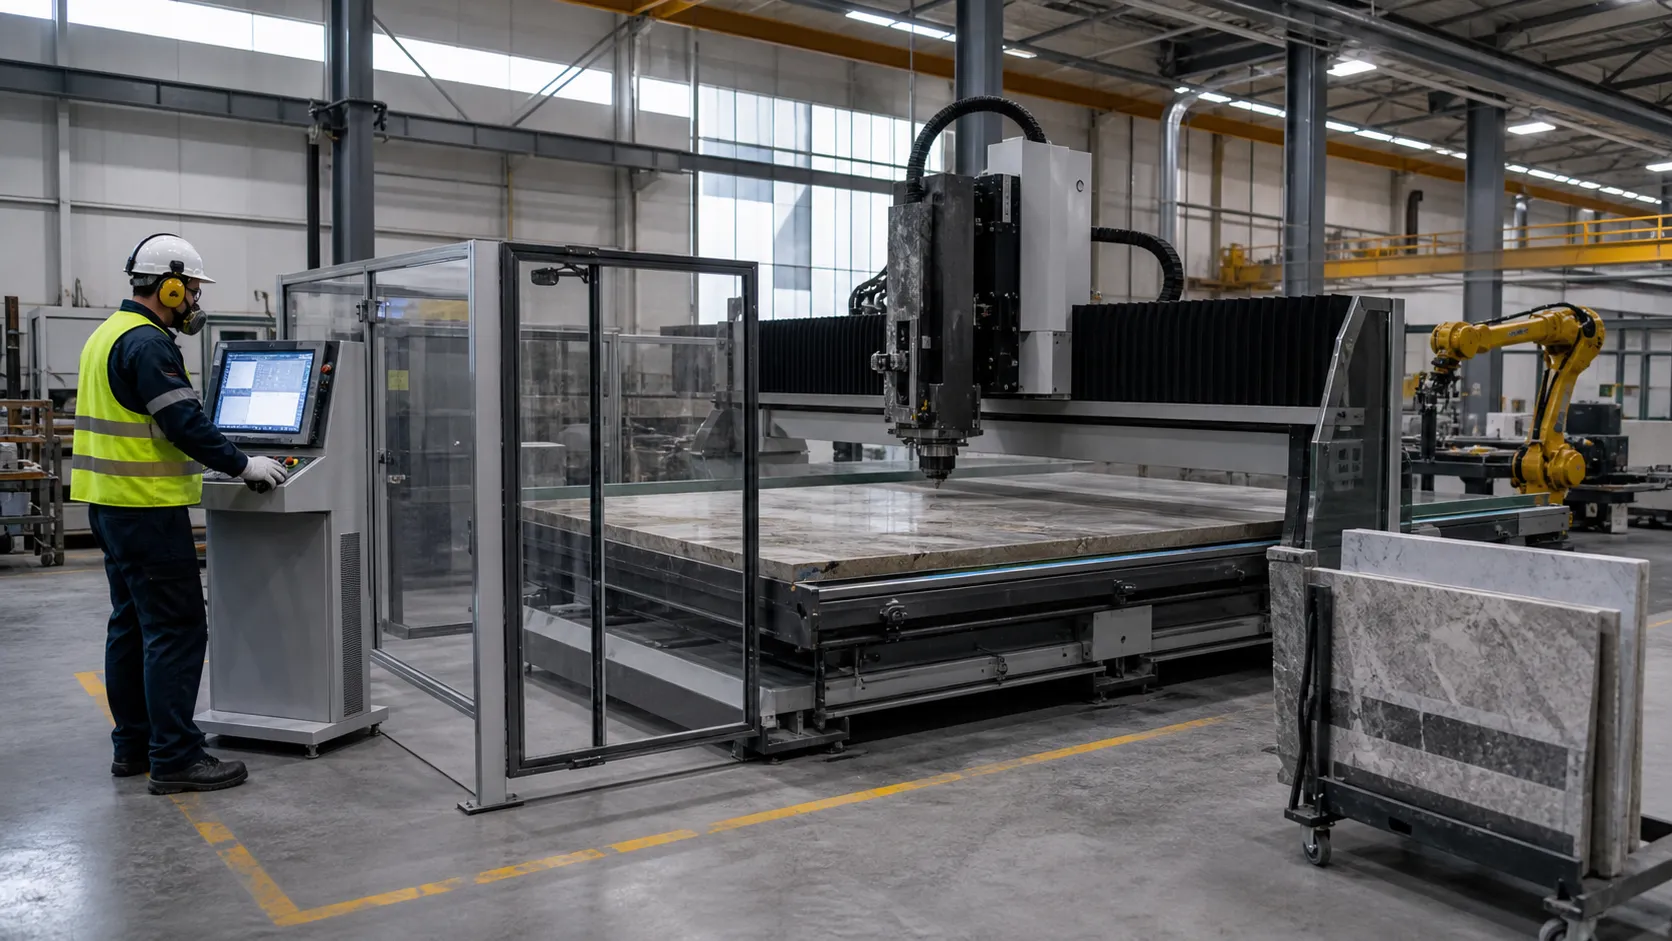
When stepping into the world of CNC wood carving, the most common frustration we hear from woodworkers is losing a beautiful piece of timber halfway through a four-hour cut because the machine couldn't handle the strain. Achieving flawless 3D carving relies entirely on your equipment selection. If your machine flexes even a fraction of a millimeter under load, you will see it instantly in the form of rough surfaces, broken bits, and ruined workpieces.
Hobbyist CNC vs. Industrial Grade Production
Choosing a computer-controlled router tool requires a realistic look at structural rigidity, footprint, and power requirements.
- Hobbyist CNC Kits: Typically constructed with lightweight aluminum extrusion frames and running on standard 110V wall outlets. While great for small spaces and light engraving, they lack the mass required to damp vibrations during deep, multi-axis 3D carving.
- Industrial Grade Production Machines: Built with heavy, stress-relieved welded steel frames and utilizing 220V or 480V three-phase power. The massive footprint and weight are intentional—they absorb mechanical forces so your cutting tool stays perfectly on track.
The Heart of the Machine
To maintain precision during complex relief carving, the drive mechanics and cutting motor must deliver consistent, unyielding performance.
| Feature | Entry-Level / Router Motors | True Industrial Spindles |
|---|---|---|
| Motor Type | Brushed traditional router | Brushless high-frequency spindle |
| Cooling | Forced air (loud, blows dust) | Liquid-cooled or sealed fan (quiet, continuous run) |
| Bearings | Standard consumer bearings | Angular contact precision bearings |
| Drive Mechanics | Lead screw or belts (prone to backlash) | Ball screw (high precision) or Rack-and-Pinion (speed + power) |
For intricate 3D carving, ball screw drive systems offer the highest accuracy on the Z-axis, while premium rack-and-pinion systems deliver the torque needed to move heavy gantry assemblies across large X and Y expanses without losing steps.
The ProMach Advantage
We engineered our ProMach CNC wood router series specifically to solve the structural weaknesses that plague standard carving machines.
- Optimized Chassis Rigidity: We use heavy-walled, aircraft-grade structural steel that is heat-treated to eliminate internal stresses before machining. This massive foundation completely eliminates harmonic chatter.
- Heavy 3D Wood Clearing Passes: When your finishing toolpath demands deep roughing passes through dense hardwoods like oak or walnut, our high-torque industrial spindles slice through material without slowing down.
- Deflection-Free Gantry: By pairing oversized linear guide rails with dual-drive motor setups, we ensure that our cutting head remains perfectly vertical, preventing the tool deflection that ruins fine vertical details and lettering.
Understanding Tooling
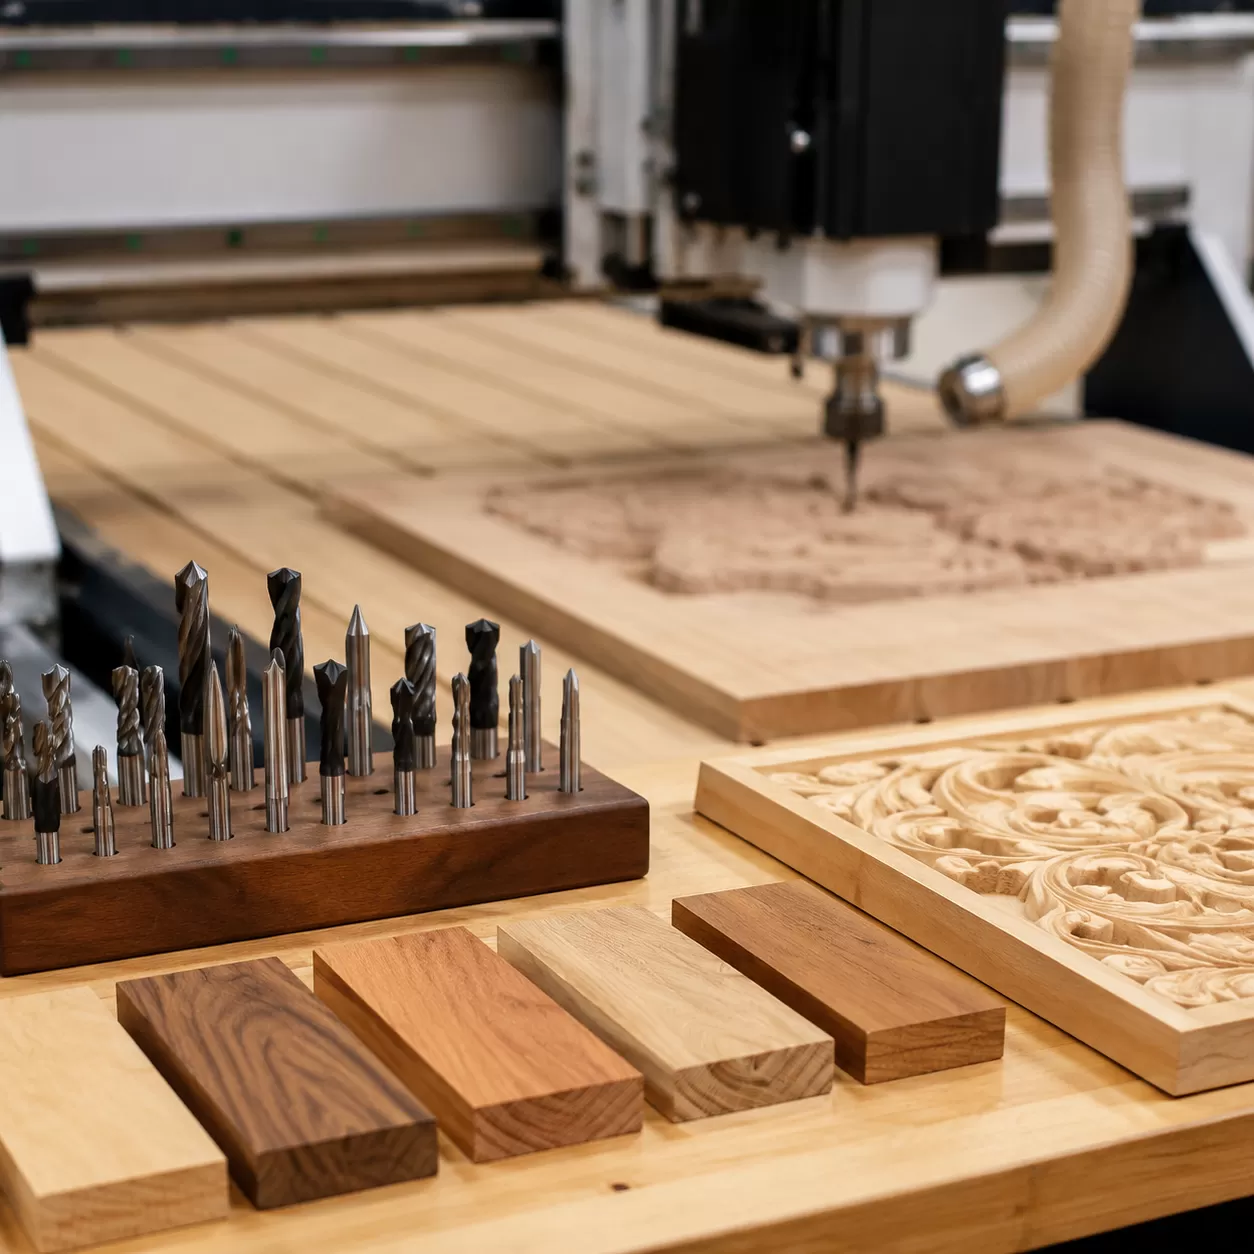
Choosing the right cutter determines the success of your 3d carving projects. The geometry of your router bits dictates how cleanly the machine clears material, how much sanding you will face later, and whether you experience wood tear-out.
The Geometry of Carving Bits
Different carving styles demand distinct bit shapes to achieve clean results on a computer-controlled router tool:
- Upcut End Mills: These bits pull chips upward out of the cut. They are excellent for fast material removal during a roughing pass, but they can leave frayed edges on the top surface of the wood.
- Downcut End Mills: These push chips downward, leaving a perfectly clean top edge. They are ideal for shallow pocketing, template cutting, and thin veneers, though chip evacuation is more limited in deep grooves.
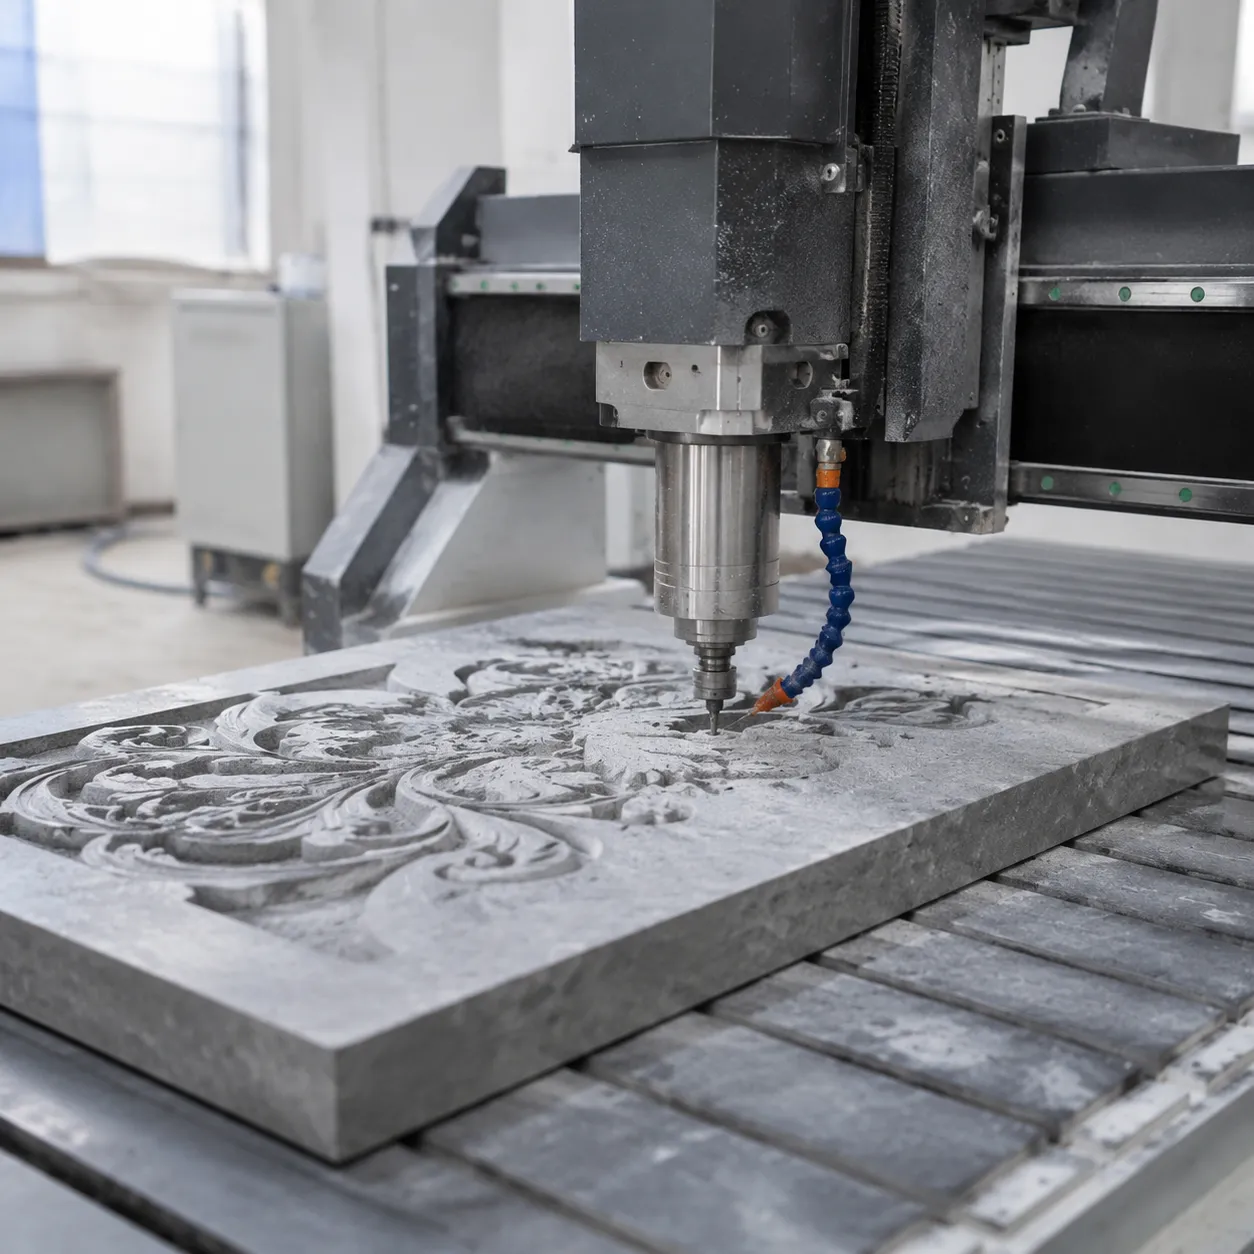
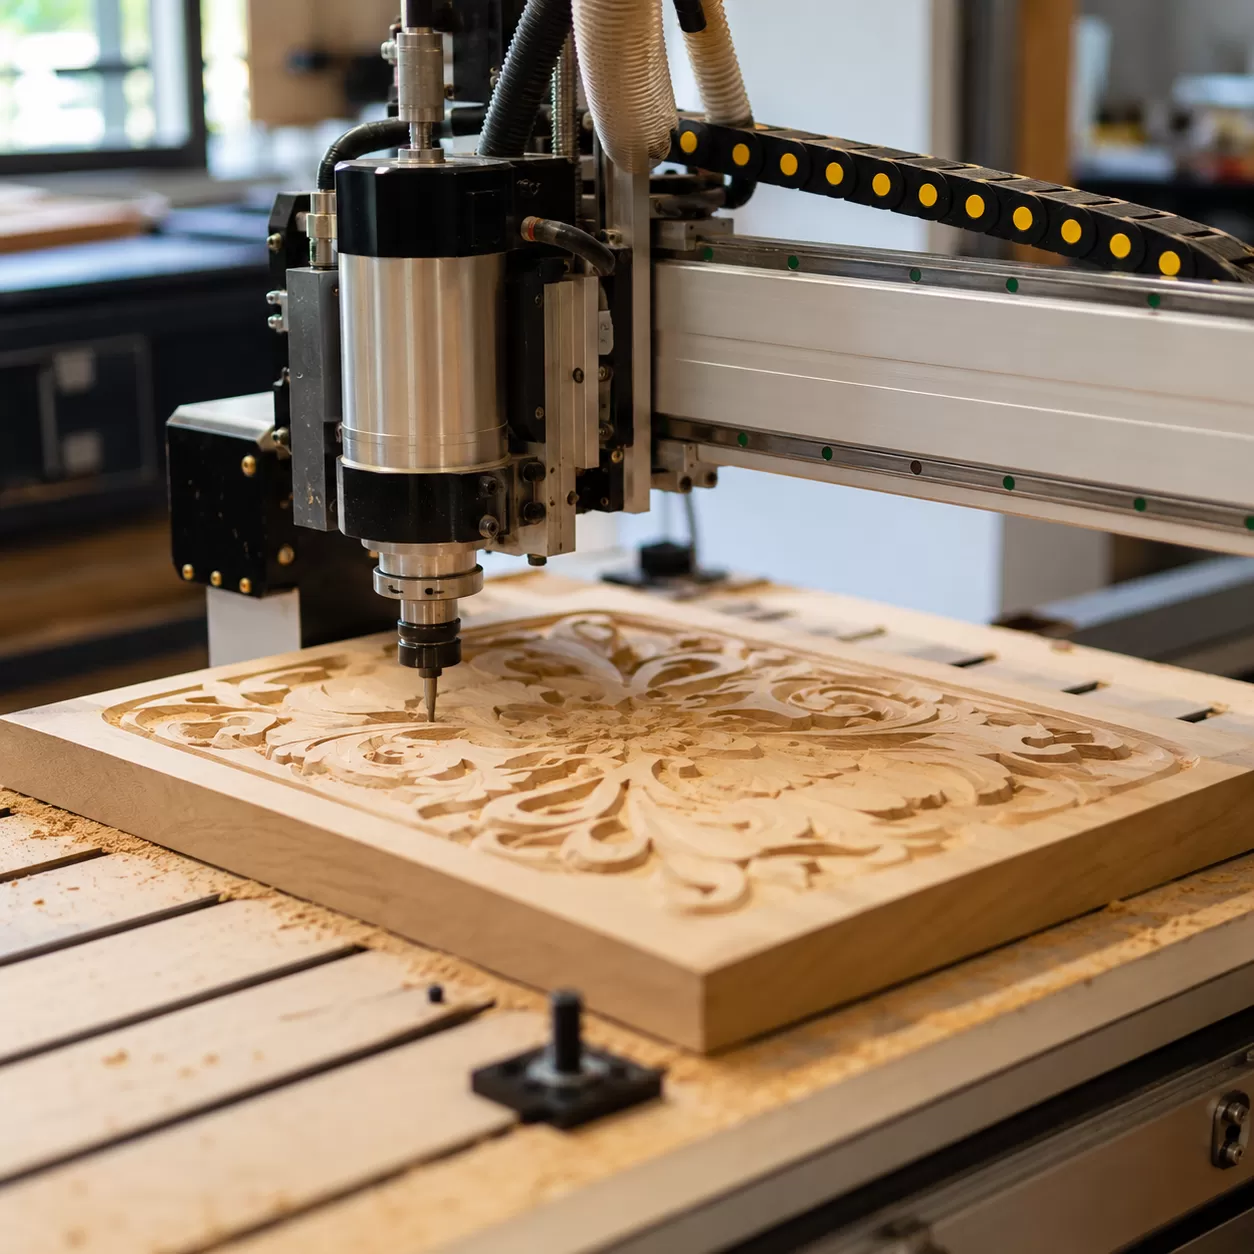
- Ball Nose Bits: Featuring a rounded tip, the ball nose bit is the mandatory tool for organic 3D contours and smooth relief carving. It eliminates the stepped look left by flat end mills.
- V-Bits: Available in 60-degree, 90-degree, and 120-degree angles, these are the industry standard for sharp lettering, detailed engraving and cutting, and decorative chamfers.
Material Integrity: Carbide vs. High-Speed Steel (HSS)
When selecting tooling for a cnc wood router, tool composition directly impacts your production costs and finishing quality.
| Feature | Solid Carbide Bits | High-Speed Steel (HSS) |
|---|---|---|
| Hardness | Extremely high; retains a sharp edge up to 4x longer. | Moderate; dulls quickly under friction. |
| Heat Resistance | Superb; handles high feeds and speeds without softening. | Poor; prone to overheating and burning wood. |
| Best Used For | Dense hardwoods (Oak, Walnut, Maple) and continuous production. | Softwoods, plastics, or light hobbyist applications. |
For professional wood carving, solid carbide tooling is necessary to prevent edge degradation halfway through a complex finishing toolpath. Using high-quality carbide ensures clean cuts and stable performance on industrial machinery, such as our high-performance 1530 CNC wood router.
Digital Workflow
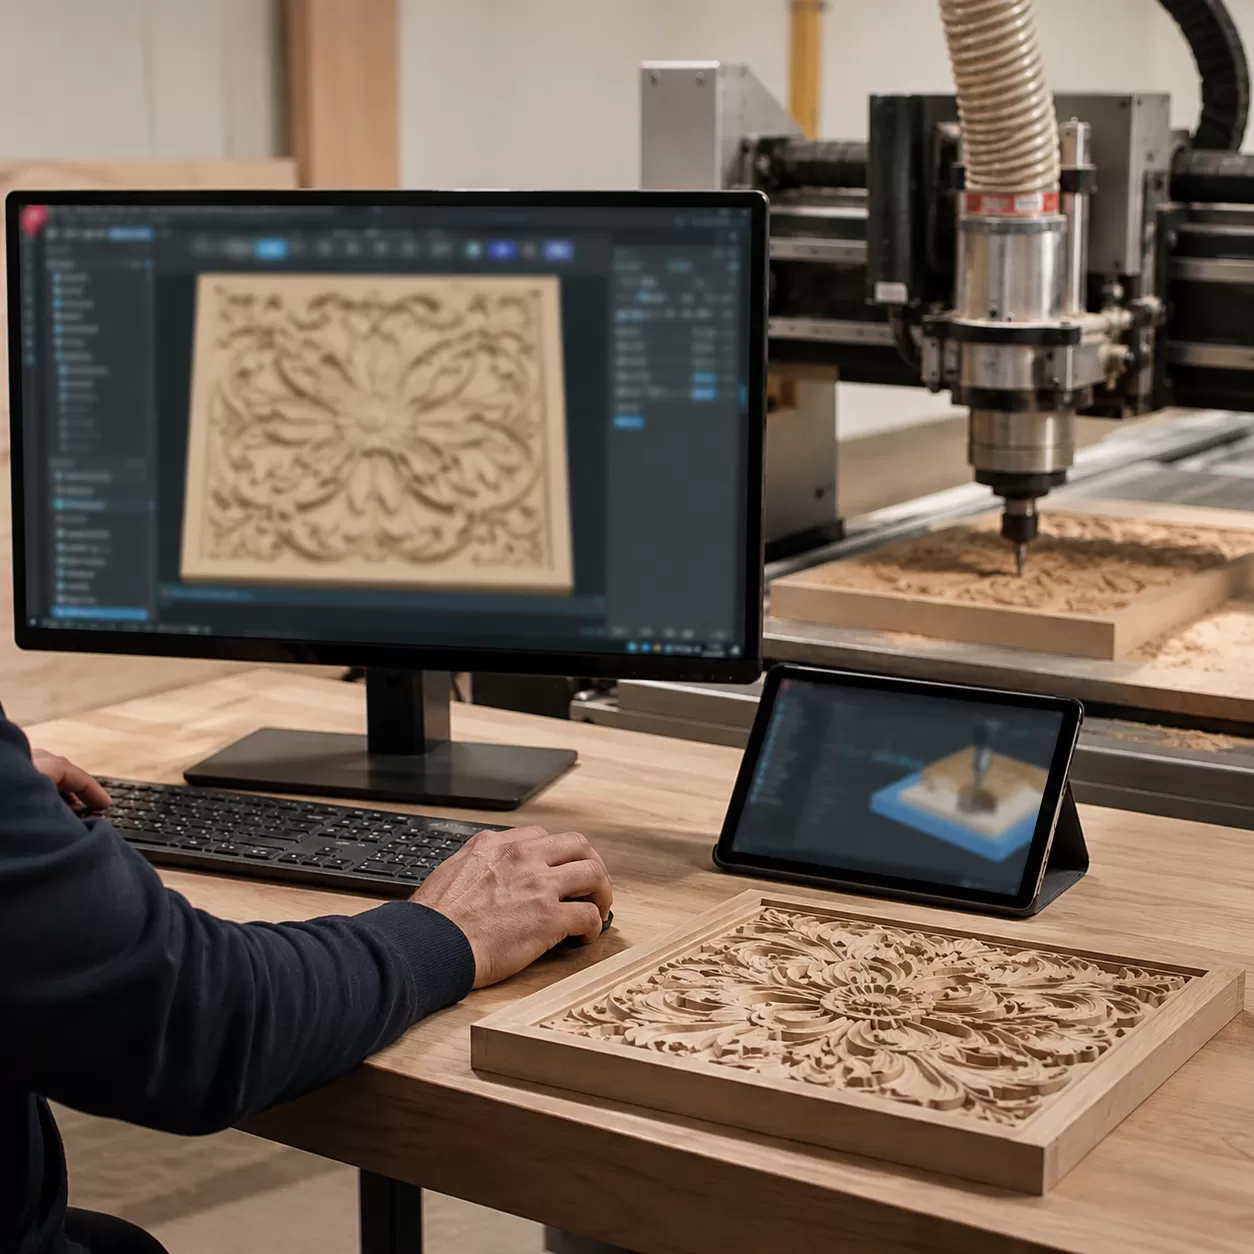
As a manufacturer of CNC wood routers, we know that high-performance hardware is only as good as the instructions it receives. This stage bridges the gap between your creative vision and physical execution through a three-step software pipeline.
Step 1: CAD (Computer-Aided Design) – Bringing the Vision to Life
Every project starts in CAD software, where you create or import the geometry for your computer-controlled router tool.
- Vector Files vs. 3D Meshes: For 2D cutting, pocketing, or simple engraving, use vector formats like DXF, SVG, or AI. For intricate, organic 3D carving and relief work, you will need 3D meshes like STL or OBJ files.
- Sourcing and Prepping 3D Relief Files: When importing 3D models, ensure the model gradient is smooth. Rough edges or poorly optimized meshes create jagged paths, which translates to unwanted chatter marks on your wooden workpiece.
Step 2: CAM (Computer-Aided Manufacturing) – Mapping the Toolpaths
Once the design is finalized, you must translate that model into specific tool movements using dedicated https://cncmachinecn.com/resources/cnc-softwarehttps://cncmachinecn.com/resources/cnc-software/">design software (CAD/CAM). This is where you define how the machine actually cuts the material.
- Workspace & Coordinate Setup: Define your physical material dimensions in the software and establish your X, Y, and Z zero coordinates (typically the top surface or center of the workpiece).
- The Roughing Pass: This initial step uses a larger end mill to hog away the bulk of the waste material quickly, leaving a stepped, stepped-down approximation of the final shape.
- The Finishing Toolpath: A smaller ball nose bit follows the roughing pass, utilizing tight stepover percentages (often 8% to 12% of the tool diameter) to clear away the steps and leave a smooth, detailed surface.
Step 3: Post-Processor & G-Code Generation
The final phase of the digital workflow translates your visual toolpaths into machine language.
What is G-code? G-code is the universal programming language used by CNC machines, consisting of coordinate lines and commands that dictate speed, feed rates, and movement directions.
To ensure your machine interprets these paths correctly, you must select the correct post-processor configuration for your specific machine controller during the G-code generation stage. The exported G-code file is then loaded directly into your CNC wood router interface, ready for execution.
Material Preparation
When figuring out how to carve wood with a cnc router, material selection dictates your feed rates, bit longevity, and the crispness of your final detail.
Hardwood vs. Softwood Behaviors
Different timber species react differently to a high-speed router bit. Selecting the right wood prevents tear-out and ensures clean definition in relief carvings.
- Dense Hardwoods (Cherry, Maple, Walnut, Oak): These are the gold standard for intricate cnc wood router projects. Cherry and Maple feature tight, uniform grain structures that hold fine detail perfectly without chipping. Walnut offers premium contrast, while Oak provides beautiful texture but requires careful toolpaths to manage its open grain.
- Softwoods (Pine, Cedar): While budget-friendly, softwoods are prone to fuzzing and tearing. Pine contains heavy pitch (sap) that can heat up and gum up your carving bits. If you use softwoods, increase your spindle RPM and use sharp, downcut bits to clean up the edges.
Moisture Content and Internal Stress
Never carve wet or improperly seasoned lumber. Wood with a high moisture content introduces severe internal stresses. As the computer-controlled router tool removes material from one side, the tension balances shift, causing the workpiece to warp, cup, or twist mid-carve or shortly after completion. Always use kiln-dried lumber with a moisture content between 6% and 8% to guarantee dimensional stability.
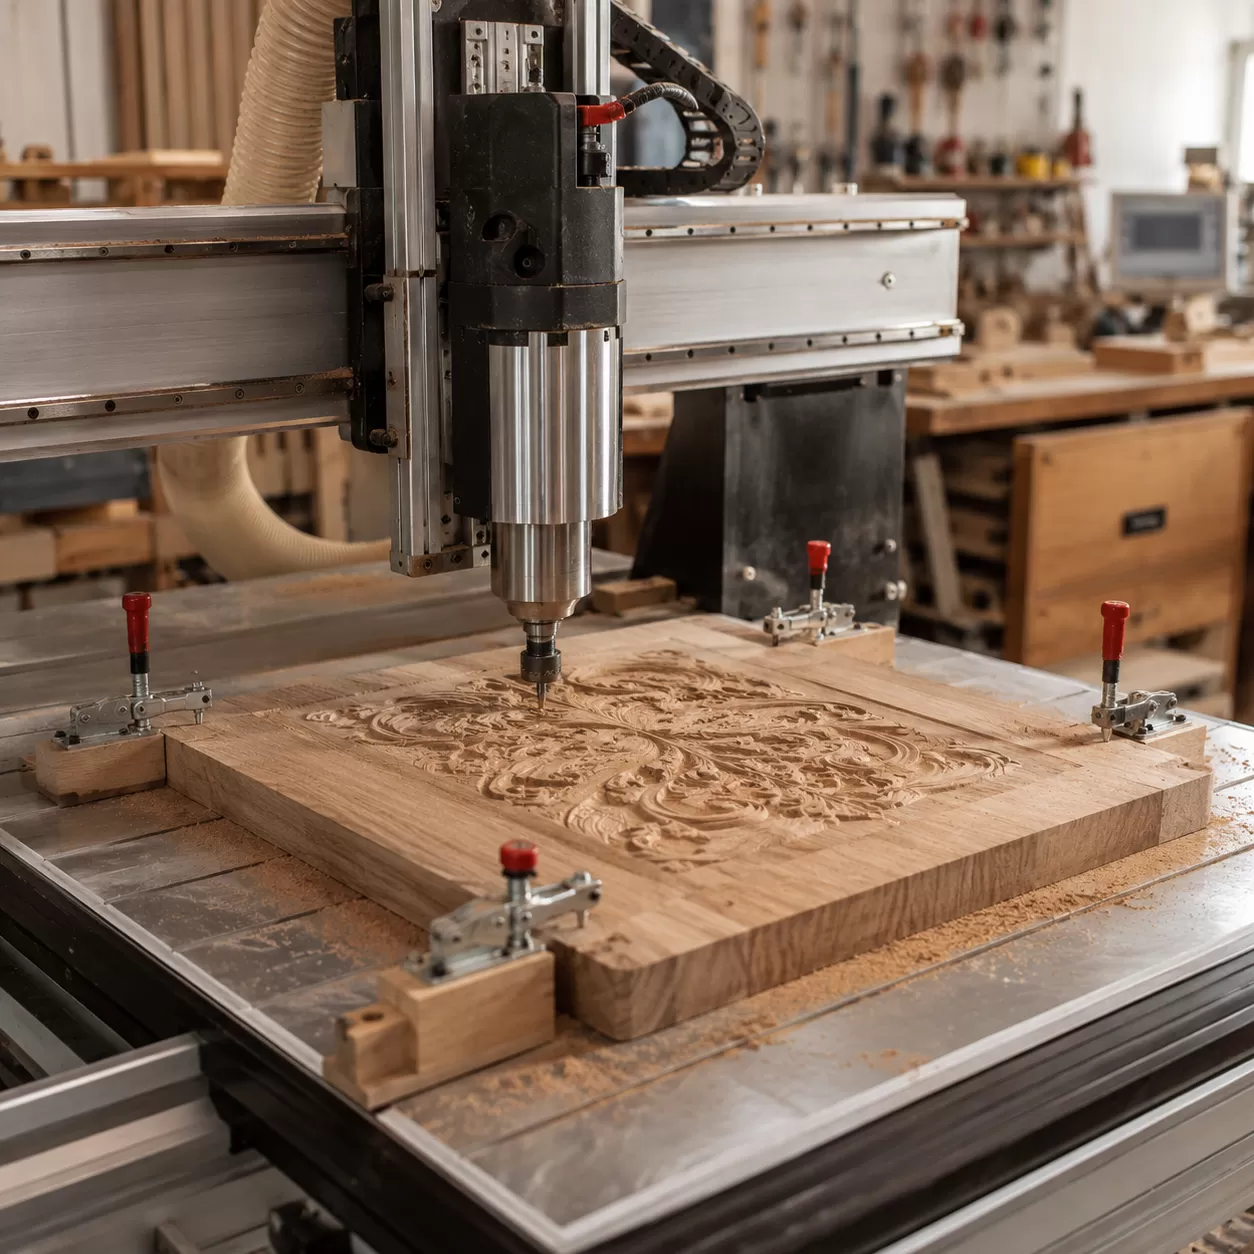
Workpiece Hold-Down Strategies
You must match your hold-down method to the geometry of your stock.
| Hold-Down Method | Best Used For | Pros | Cons |
|---|---|---|---|
| Mechanical Clamps | Thick boards, roughing passes | Heavy-duty holding power, reusable | Clamps can block the toolpath; risk of bit collision |
| Tape & Superglue | Thin stock, profile cuts, flat reliefs | No physical clamps in the way; holds small pieces | Requires clean surfaces; cleanup time |
| T-Track Systems | Standard square or rectangular blanks | Adjustable, highly secure | Limited to outer edge clamping |
| Vacuum Tables | Large sheets, high-production nesting | Instant clamping, no part obstructions | Requires high power and large surface area |
For standard 3D carving on a production-grade 1325 CNC wood router, combining a T-track system with mechanical clamps offers the most reliable hold for heavy clearing passes. For delicate, thin relief work where clamps might hit the spindle, the painter's tape and cyanoacrylate (CA) glue method keeps the top surface completely clear.
Step-by-Step Execution
Executing a flawless 3D carving requires careful preparation and real-time monitoring to prevent material waste and tool breakage.
Pre-Flight Inspection Checklist
Before powering up your computer-controlled router tool, run through a strict pre-start protocol to ensure machine and operator safety:
- Clear the Workspace: Remove all loose tools, debris, and offcuts from the router bed.
- Check Axis Limits: Manually verify that the gantry moves freely and will not hit physical hard stops.
- Inspect the Collet and Spindle: Check for resin buildup or debris inside the collet. Ensure the carving bit is seated deeply enough and torqued to specification.
Setting the Work Coordinates (G54)
Establishing an accurate localized zero position ensures your cnc wood router carves precisely where intended.
- Manual Alignment: Bring the bit down until it barely touches a piece of paper on the workpiece surface to set the Z-axis, then align X and Y to your physical registration marks.
- Electronic Touch Plates: Use an electronic touch probe for maximum precision. This automates the Z-axis zeroing process, which is critical when swapping from a roughing pass tool to a fine ball nose bit.
Dialing in Feeds and Speeds
Balancing your spindle RPM and travel feed rate keeps your tools cool and cuts clean. Incorrect settings result in friction, leading to ruined wood grain and premature tool wear.
| Factor | Overly Fast | Overly Slow |
|---|---|---|
| Spindle RPM | Causes friction and burns the wood | Causes heavy vibrations and chipping |
| Feed Rate | Risks breaking delicate carving bits | Rubs the material instead of cutting, creating smoke |
Calculate your target chipload based on the wood species. If you notice discoloration or smoking during the cut, increase your feed rate or lower your spindle RPM immediately to prevent burning.
Monitoring the Live Cut
Do not leave the machine unattended during operation. Experienced operators rely on auditory and visual cues to monitor cutting health:
- The Right Sound: A healthy 3d carving operation produces a consistent, crisp hum or steady cutting sound.
- Signs of Stress: High-pitched screaming or heavy chatter indicates the machine is pushing too hard or the workpiece is vibrating.
- Chip Production: The machine should produce clean, distinct wood chips rather than fine, powdery dust, which indicates tool rubbing.
If you are looking for practical inspiration or setting up a new workflow, check out these successful woodworking projects to see how these feed and speed balances translate to finished products.
Post-Processing
Once your cnc wood router finishes its final pass, the right post-processing techniques will transform a raw machine cut into a flawless masterpiece. Proper execution during and after the cut significantly cuts down on manual labor.
Minimizing the Sanding Phase
The best way to reduce sanding time is to optimize your finishing toolpath directly in your design software.
- Reduce Stepover: Keeping your stepover between 8% and 10% when using a ball nose bit leaves fewer tool marks and tiny ridges.
- Conventional vs. Climb Milling: Running a final light cleanup pass using climb milling reduces fuzz and tear-out along the wood grain.
- Rest Machining: Use targeted toolpaths to clear out tight corners rather than running a tiny bit over the entire project.
Hand Finishing Detailed Crevices
Even the cleanest 3D relief carving requires some targeted manual touch-ups to crisp up the fine details.
| Tool Type | Best Used For | Application Tip |
|---|---|---|
| Progressive Sanding Grits | Flat areas and broad slopes | Start at 150-grit to remove tool lines, then move to 220-grit. |
| Detailing Files & Rifflers | Sharp valleys and tight undercuts | Gently scrape away fuzzy grain without altering the carved geometry. |
| Nylon Abrasive Brushes | Complex 3D organic surfaces | Mount to a rotary tool or drill to polish deep crevices quickly. |
Finishing for Contrast
Applying the right finish brings out the depth of your 3d carving and highlights the natural grain orientation.
- Penetrating Oils: Walnut or cherry woods benefit from Danish or tung oil, which darkens the deep recesses naturally and adds a rich, matte look.
- Gel Stains: Perfect for high-contrast looks. Apply a dark gel stain across the entire piece, then wipe it off the raised surfaces so the dark pigment stays trapped in the lower carved details.
- Clear Topcoats: Spraying a satin or matte lacquer protects the intricate details of your engraving and cutting projects without creating pooling issues in the deep grooves.
Safety Protocols and Maintenance for CNC Environments
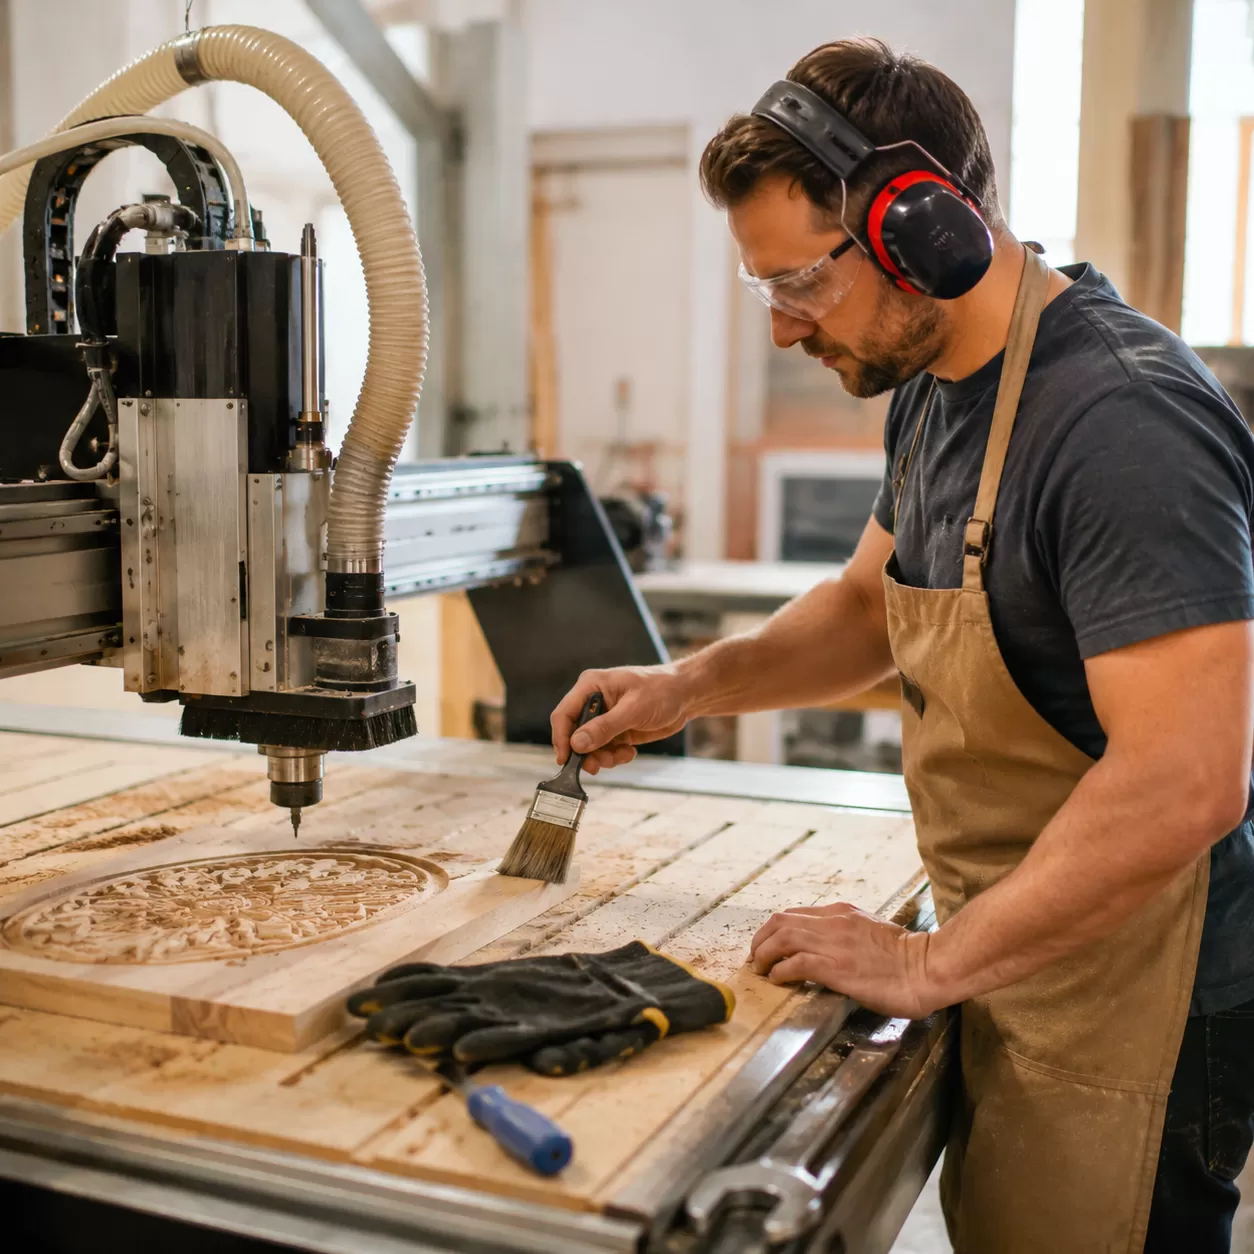
Operating a cnc wood router safely requires strict adherence to environmental controls and preventative care. Wood carving generates high volumes of fine particulate matter and operational hazards that can compromise both the user and the machinery if left unmanaged.
Dust Control and Air Filtration
Wood dust is a serious respiratory hazard and a potential ignition source. Implementing a robust containment strategy is non-negotiable for any workshop.
- High-Velocity Dust Boots: Use a dedicated dust boot that surrounds the spindle to capture chips directly at the cutting source.
- Particulate Filtration: Connect the dust boot to a high-volume collector equipped with a micron-rated filter to clear fine airborne dust.
- Workspace Air Cleaners: Run ambient air filtration systems continuously during and after a 3D carving job to maintain air quality.
Spindle Safety and Hazard Awareness
The high rotational speeds of a computer-controlled router tool demand constant vigilance and proper personal protective equipment (PPE).
- Eye and Hearing Protection: Always wear impact-resistant safety glasses and noise-canceling ear protection to mitigate the high-frequency whine of the spindle.
- Fire Hazard Mitigation: Dull bits or incorrect feeds and speeds can cause friction heat, leading to smoldering wood chips. Never leave a running machine unattended.
- Emergency Stops: Ensure the physical E-stop button is completely unobstructed and within arm's reach at all times.
Machine Lifespan and Daily Maintenance
Routine maintenance prevents premature wear, preserves cutting accuracy, and protects your investment. Keeping spare parts on hand ensures minimal downtime during routine upkeep; we recommend sourcing reliable CNC router parts to replace worn components promptly.
| Maintenance Task | Frequency | Target Components |
|---|---|---|
| Debris Clearance | After every cut | Ball screws, linear rails, and limit switches |
| Lubrication | Daily / Weekly | Linear rail bearings and lead screws (using manufacturer-approved oil) |
| Collet Inspection | Weekly | Spindle collet and cover nuts (check for pitch buildup or burrs) |
| Belt & Fastener Check | Monthly | Drive belts, gantry bolts, and wiring harness connections |
Frequently Asked Questions (FAQs)
Why is my CNC router burning the wood?
Wood burning happens when the heat generated from friction cannot escape. This typically occurs because your feed rate is too slow or your spindle RPM is too high, causing the tool to rub against the material rather than cutting clean chips. To fix this, increase your feed rate or lower your spindle speed. Using dull router bits or cutting against the wood grain orientation can also cause severe friction and burn marks.
What is the best wood for 3D relief carving on a CNC?
Dense hardwoods with tight, uniform grain structures are the absolute best choices for intricate 3D CNC router work. Cherry, Maple, and Walnut hold incredible detail without chipping or fraying. While Oak is a durable hardwood, its open grain can sometimes look splintered on very fine details. Softwoods like Pine or Cedar are prone to tear-out and pitch buildup, making them less ideal for complex relief carving.
How do I prevent my wood workpiece from moving during a cut?
A secure workpiece hold-down strategy is vital for safety and accuracy. For flat panels and sheet goods, a reliable vacuum table offers the fastest and most uniform holding power. If you do not have a vacuum system, you can use a combination of mechanical T-track clamps and the tape and superglue method (applying painter's tape to both the wasteboard and the workpiece, then bonding them with cyanoacrylate adhesive) to eliminate any lifting or shifting during heavy roughing passes.
What stepover percentage should I use for a smooth finish?
The ideal stepover percentage depends entirely on the type of toolpath you are running:
- Roughing Pass: Use a 40% to 50% stepover with a heavy-duty end mill to remove bulk material quickly.
- Finishing Toolpath: Use an 8% to 12% stepover with a premium ball nose bit.
Keeping the finishing stepover low minimizes visible tool lines (scallops), which drastically reduces the manual sanding phase and preserves the crisp edges of your 3d carving.